
Global and Local Filters
As your timeline becomes more complex, it can be useful to reduce the visible items to show only those that are relevant to your current workflow.
Filters can be applied globally across all views, or locally to a single focused view. The latter option allows you to apply different filters to each view in your timeline, making it possible to compare different sets of data side by side (e.g. two local filters could allow you to compare the events allocated to different people).
Note: As iPhone only shows a single view, there is only a global filter for the iPhone, which affects all views except for entity lists.
The ability to apply different filters to each view provides a more flexible and user-friendly replacement for the “Group By” functionality of version 2. In version 2, if a user wanted to compare the timelines of two people, they would choose Group ByPerson, and would be shown separate groups for every different Person in the timeline at once.
Now, you can configure two or more separate split views with independent filters, and those resulting views can be independently scrolled, making it easier to view and compare the relevant information on a single screen.
As filtering by a single entity such as Person is a common workflow function, you can access a quick shortcut to apply a filter directly from Entity Lists (see Shortcuts to Entity Filters below).
The Filter Panel
You can configure both global and local filters within the Filter Panel, which is accessed by clicking on the filter icon (  ) in the Sidebar.
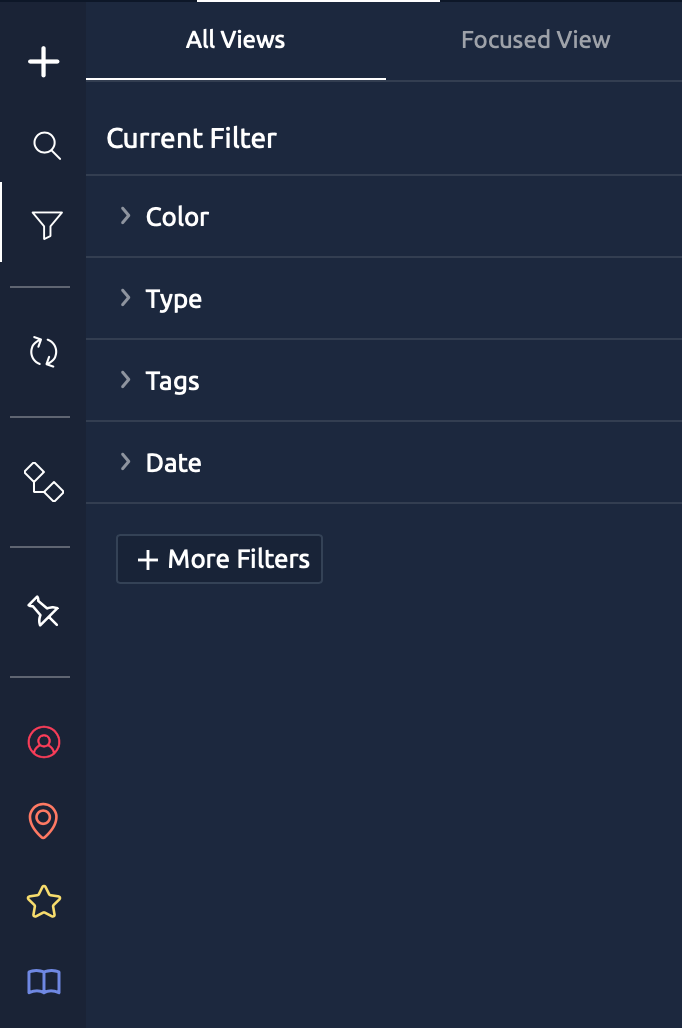
The Filter Panel will default to affect "All Views" (i.e. the Global Filter) each time it is opened, meaning that any filters you apply will affect every view in the timeline equally.
If you wish to change filter settings for the focused view only, then you should click on the "Focused View" tab at the top of the filter panel. You can read more about split views and the Focused Views in our User Interface Overview article.
To reduce screen clutter, only four commonly used filter options (Color, Type, Tags, and Date) are initially visible when you open the filter bar, but you can access a wider range of filter options by clicking on the More Filters button at the bottom of the existing list.
Changing Filter Settings
Enabling a Filter Condition
Filters are created by combining one or more filter fields (criteria) to determine which items should remain visible. Each filter criteria consists of a field and value.
To begin filtering by a particular field:
- Choose whether to apply the filter to All Views or just the Focused View
- Ensure the field is visible in the Filter Panel. if it is not visible, click on the More Filters button to add it to the visible list.
- Click on the disclosure arrow (
 ) to expand the field
 - Depending on the field type, select or type the values that you wish to use for the filter:
- Some filters such as Color or Type will allow the user to select from a list of checkboxes
- Longer lists, such as entities, require each individual item to be added from a dropdown list to save space
- Date and numeric fields will allow the user to enter a range of allowed values
- Text fields will allow the user to enter any terms the filter must match
- Some fields will also allow the user to determine the logic that should be applied if multiple values are provided (i.e. does an item need to match All provided values, Any of the values, or None of the values).
 ) to expand the field
When specifying filter criteria, you are always specifying the conditions an item must meet in order to be displayed (that is, those items matching the filter are displayed, and those items not matching the filter are hidden).
Adding further conditions
With one field configured, you can then add further fields to your filter as required.
Once more than one field is applied to the filter, an additional option will be added to the top of the Filter Panel to determine how the individual filter criteria should be combined:
- Match All: Items in your timeline view must match all of the applied filter conditions.
- Match Any: Items in your timeline view must match any of the applied filter conditions.
For those familiar with boolean fields, ‘Match All’ is the equivalent of the AND operator, while ‘Match Any’ is the equivalent of the OR operator.
Removing filter conditions
To remove a criteria from your filter, click on the Clear button alongside the relevant field name.
To remove all criteria and disable the filter completely, click on the Clear button at the top of the Filter Panel alongside the Current Filter label.
Saving Filters
If you wish to save a commonly used filter, you can click on the Save button alongside the Filter label, and then enter a name for the saved filter.

Once saved, the filter will appear when you click Load at the top of the filter panel. Clicking on a saved filter will immediately apply the filter, replacing any existing filter.
You can delete a saved filter by clicking on the delete icon (  ) alongside the filter name (which will appear with the Load list expanded).
Applying Automatic Filters
When working in a filtered view, if you add a new item Aeon Timeline will automatically apply eligible filters. For example, if you are working within a view with the filter 'Place:Australia' applied, when you create a new item in that view a relationship with Australia will be automatically created.
Filters for all views and the selected view are both considered.
Filters that will be automatically applied include relationships, colours, boolean and list properties. Dates, items types and text properties from filters will not be applied.
When you drag existing items into filtered views rather than creating new items, it will attempt to apply the filter criteria, but will not overwrite any existing values.
How views apply the filter
For chronologically-ordered views (Timeline, Spreadsheet, Relationship and Subway Views), the following rules apply:
- Items that match the filter criteria are displayed as normal
- Items that do not match the filter criteria, but contain children that do, will be shown with a faded appearance, to ensure the overall structure of the data is retained
- Items that do not match the filter criteria, and whose children also do not match the filter, are removed from the view completely
Note: Criteria 2 does not apply to Subway View, as it does not show parent/child relationships.
For the remaining views (Narrative, Outline, and Mindmap), items that do not match the filter criteria are faded rather than hidden completely. This is because the visual position of items in those views is only really relevant in relation to the items around them, and too much context would be lost if those events were hidden completely.
Shortcuts to Entity Filters
One of the most common reasons to apply filters is to view events associated with one specific item, such as an individual person or project. For this reason, Aeon Timeline 3 provides an additional shortcut approach to apply a local (Focused View) filter directly from the Entity List Panel.
To apply a filter in this way:
- Open the Entity List by clicking on the relevant item type icon in the Sidebar
- Click on the Filter icon (
 ) alongside the entity you wish to include in the filter
 ) alongside the entity you wish to include in the filter
This will adjust the filter for the Focused View to show only items matching this item (the global "All Views" filter is not affected). When applying this new filter, any existing filter condition affecting the same item type will be replaced. For example, adding a filter for "Person A" will replace an existing filter for "Person B".
All other Focused View filter conditions affecting other fields will be retained.
If you instead wish to preserve the existing filter criteria for the same item type, you can hold the Cmd (Mac) or Ctrl (Windows) key when clicking on the filter icon, and the entity will be added to the existing filter criteria instead.