How To Use Story Arcs
A story arc is a continuing storyline or plot thread that exists in a novel or story. It is a term used to describe the path of a story and the buildup of and letdown of suspense and tension as the plot unfolds.
Within a larger story, there can be smaller arcs. These may often follow plot lines of characters other than the protagonist, or secondary motivations of the main character.
For example, Lord of the Rings: the Two Towers contains multiple story arcs, including:
- Frodo and Sam’s journey to destroy the Ring
- Aragorn, Legolas and Gimli’s travel journey to Rohan
- Merry and Pippin’s meeting of the Ents.
These are all different plot lines that happen concurrently throughout the novel. Aeon Timeline allows you to sort your events into different story arcs so you can track them independently and relative to one another.
The following steps describe how to setup your timeline to use Arcs:
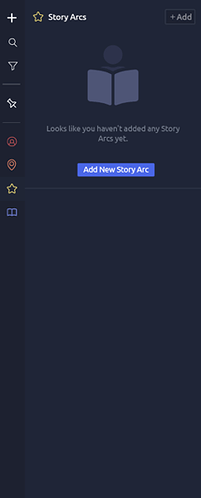
1. Add Arcs to Your Timeline
To add a story arc to your timeline, click the Story Arc icon on the toolbar on the left to open the Story Arc panel. Click “Add New Story Arc” to add a new Arc. Give the Story Arc a name, and edit any other information (such as adding notes or relationships) via the Inspector. Add as many arcs as you like by clicking the “Add” button in the top right of the panel.
You can also add Arcs quickly by clicking the ‘+’ sign on the toolbar and choosing “Story Arc”
2. Assign Arcs to your Events
You can assign what story arc your event belongs to via the Inspector.
Click on the event and click on the relationships tab in the inspector. Click the plus sign next to Story Arc and choose the arcs you wish to add from the dropdown list. You can also assign arcs to events in Relationship View or Spreadsheet View.
3. Filter your Events by Arc
To help visualise your plot-lines you can filter your events by arc. Click on the Story Arc symbol on the left toolbar, and click on the filter symbol (  )
)
next to the story arc you wish to filter by.
Divide your screen into multiple views by clicking the split screen icon (  ) in the top right of the view, and add different filters to each window to view your different story arcs concurrently.
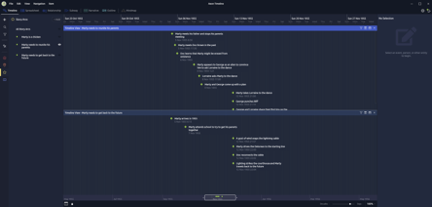
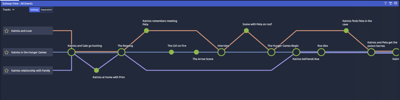
4. Use Subway View to Analyse your Arcs
Subway View lays out the events associated with each arc along “tracks” like a subway map, allowing you to analyse the chronological progression of your story arc without worrying about the time scale or their dates.
Choose the “Separated” option to analyse a story arc in isolation, or “Subway” to analyse the intersection your story arcs as your story unfolds.